How to Pack for a Move: The Complete Packing Guide | Part 2
In the previous post in this sequence, we covered the strategy: the questions to answer before you pack a single box, and how distance, movers, and storage all shape your approach. This post is the follow-through — the actual mechanics of packing, item by item, so everything you’ve wrapped and boxed arrives exactly as it left.
If you’re wondering how to pack for a move, start with our packing tips for moving guide for the planning side, then use the steps below for the actual mechanics.
Let Your Move Type Decide Your Packing Method
Before you tape a single box, remember what we covered in Part 1: how far you’re going and how long your things will be packed changes everything about how you should pack them.
A short, local move is forgiving. You control the road, the timeline, and usually the handling, so you can move faster and worry less about cushioning.
A long-distance move is not forgiving. Your boxes will be stacked, jostled, possibly left overnight in a truck or warehouse, and handled by people who don’t know what’s inside them. Pack every box as though it’s going to be dropped, stacked, and rattled around for hours, because it probably will be.
If you’re hiring a professional mover for an interstate move, the FMCSA Moving Checklist is also worth reviewing before moving day.
That difference should guide every decision below — how much padding you use, what items you take apart or leave assembled, what materials you choose, and how carefully you isolate fragile items from one another.
Think through your containers as carefully as your packing supplies.
When packing boxes for moving, the container you choose matters just as much as the materials you use inside it.
Choose a uniform container system. Boxes or crates from the same ‘system’ that come in consistent sizes (ones that work together) stack far more securely than a mismatched pile, especially in the back of a moving truck. If you’re storing items long-term or expect a damp environment, plastic tubs are worth the extra cost over cardboard or consider bagging the items before loading into boxes —I learned form a pest control guy: cardboard is far more appealing to pests, roaches in particular.
If using cardboard moving boxes – I recommend taping the bottoms instead of the pinwheel flap (no tape method) simply because the later allows for the corners of flaps to catch on other boxes below. Taping allows for boxes to be moved more easily.
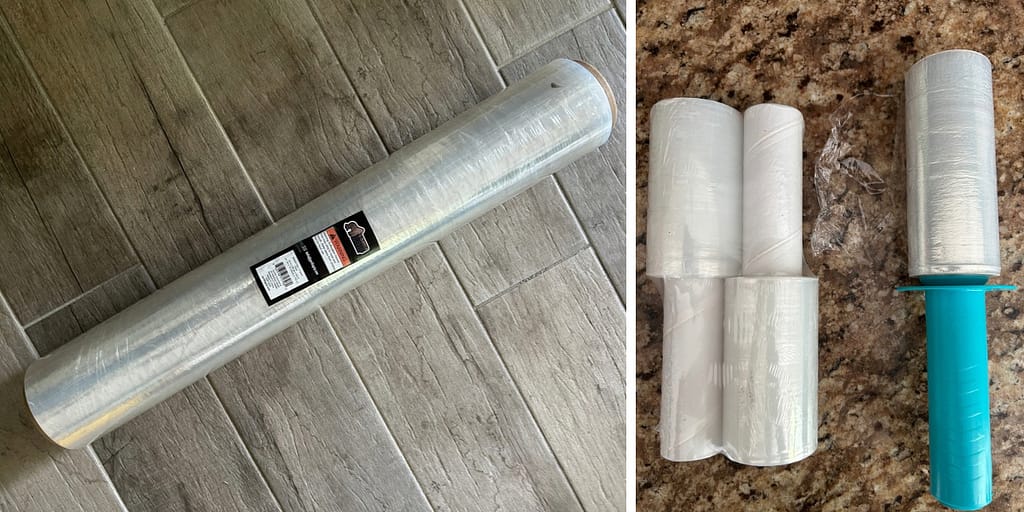
Hand-held stretch film (some call it shrink wrap or cling film) — the narrow approx 4” wide – rolls that come on a handle — is one of the most useful packing tools you can buy. Use it anywhere you might otherwise reach for tape to secure wrapping or padding – or even on it’s own to group items together. It works especially well on awkward shapes, is easy to remove, and lets you reuse plastic wrap, towels, paper, cardboard, or other cushioning materials afterward. The trick is to wrap all the way around the item so the film catches on itself first and stays firmly in place before giving a few more wraps.
The wider version is perfect to wrap furniture and larger objects.
Bubble wrap vs. padded foam wrap. Foam wrap (usually 1-4 mm thick) is a soft, seam-free polyethylene sheet that has some air bubbles trapped within used to prevent scratches on items and offers a small amount of cushioning while bubble wrap is designed to offer more cushioning and protect objects from breaking in drops and it often best for fragile goods. Be sure to match the bubble size (which also dictates the thickness) to the overall item to get the best protection. My tip for bubble wrap: put the bubbles on the inside towards the item – to preserve the integrity of the bubbles and its ability to protect. (It’s also easier to use this way with plastic stretch wrap).
Newspaper vs Packing paper. This one might just be down to preference. Newspaper may leave ink marks but is free and a good eco option. Packing paper is uniform and cleaner. I sometimes avoid both in favor of foam wrap if i am packing items to store in a facility (see above – pests).
Build a Labeling System Before You Pack a Single Box
Set this up first — it will save you more time than any single packing technique below and force you to create a packing strategy before you start.
Use different colored sticker labels with a code system that works for you. These labels (preprinted or you can make your own) can be purchased cheaply from a stationery or big box store. Assign a different color and code to each room (K-1, K-2 for kitchen, BR-1 for bedroom, BA-1 for bathroom, and so on), and stick at least two labels: one on each opposite side, of every box or container. Movers move fast and rarely have time to read detailed instructions, so a system they can recognize at a glance is far more effective than writing “kitchen — fragile — handle with care” on the lid.
Keep a running inventory as you pack – and organize each list of items by your chosen container coding system. Talk the contents of each box into a notes app or voice memo as you fill it, and snap photos as you pack and before you seal it. This matters most if you’re storing your items longer term or shipping them long distance — it’s far less critical for a local move — but the habit costs almost nothing and pays off if anything goes missing or arrives damaged.
Email yourself a timestamped copy of the list along with the photos, so you have a dated record if you ever need one for insurance but more importantly, you have a quick visual inventory catalogue to locate anything you are searching for.
If you’re wondering how to pack fragile items, the key is to stop pieces from shifting, rubbing, or knocking against each other and to protect from the other containers in transit.
Packing Dishes, Glasses, and Bowls Without Chips or Cracks
Dishes and glassware are damaged less by impact than by friction — they scratch and chip each other when they’re packed edge to edge with nothing between them, especially nested bowls and stacked plates.
Consider packing plates standing on their edge, instead of flat. Standing plates upright (nested, but on their side) rather than stacking them flat distributes pressure more evenly. Pre-formed dish-packing boxes sold at moving supply stores are built around this method. If you do decide to use the horizontal dish stack method Or even if you do opt for the vertical method – consider the tip below.
My favorite hack: round coffee filters. Flattened coffee filters slide easily between plates and bowls of almost any round shape, separating them without adding bulk. Once a stack is filter-padded, wrap the whole stack together in clear stretch film to keep it as one secure unit.

Give every glass its own space. Isolate each piece rather than letting glasses touch — contact is what causes the open, free edge of a glass to crack. Cushioned plastic shrink wrap – aka packing cling film – works well here: it conforms to almost any shape (candlesticks, stemware, statues), is easy to apply and remove, and can often be reused.
Then, pack heavier plates and bowels in the bottom of the container and more fragile glasses closer to the top. to finish, I place a stiff piece of cardboard or foamboard flat to cover all contents as an extra layer before closing/sealing any container.
Wrapping Knives, Blenders, and Other Sharp or Delicate Items
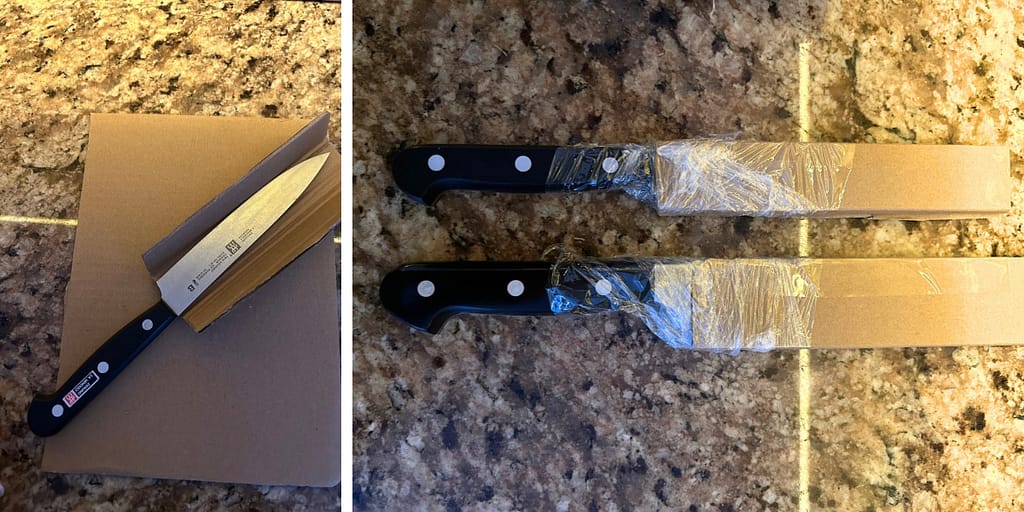
For knives: fold a piece of sturdy cardboard into a V-shape and slide the blade into the center groove, then anchor it in place with cling film — wrapping around the handle as well, not just the blade, so the cardboard can’t slip off mid-move. The goal is simple: no one should ever reach into a box and find an unprotected blade. Where possible, pack all your knives together in one clearly labeled box.
For small appliances like blenders: separate and isolate every removable piece before packing, if not using the original box. Parts that bounce around and knock against each other in transit are the most common cause of breakage — a few extra minutes of wrapping is worth it for anything you actually intend to keep using.
How to Pack Art and Mirrors So They Arrive in One Piece
Framed art and mirrors need a layered approach — quick methods work for short moves, but anything long-distance or valuable deserves the full process:
- Tape an X across the glass – with painter’s tape. If the glass does break, the tape helps keep the pieces together rather than scattering — which matters even more for artwork, where loose glass shards can tear the piece underneath.
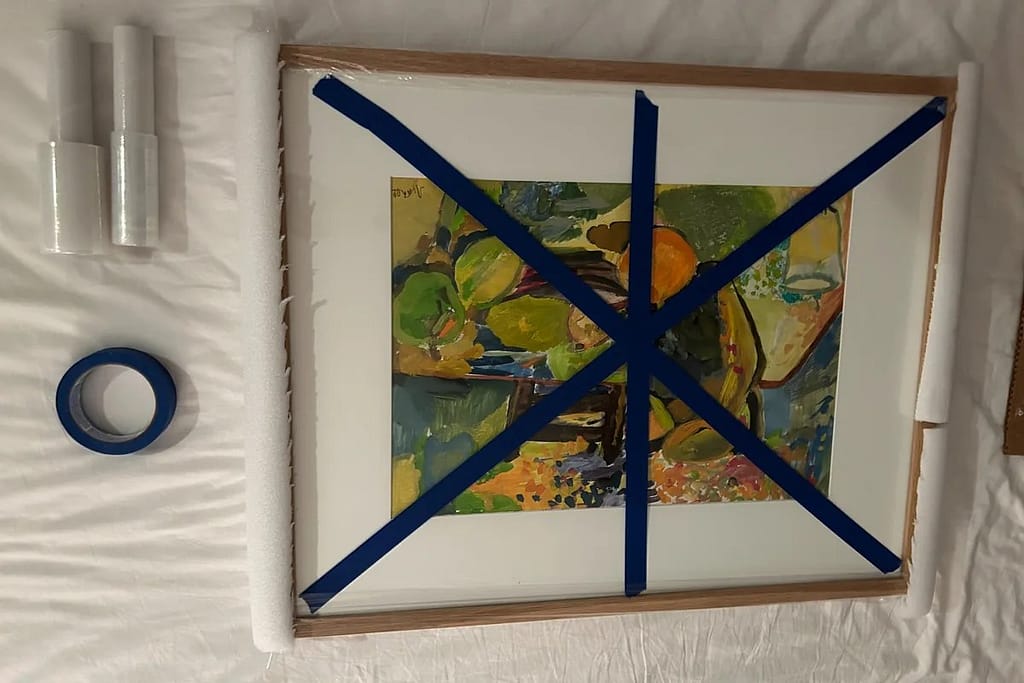
- Wrap the frame edges – with cling film to protect the finish.
- Cut a piece of cardboard to match the size of the frame – and place it over the face for an added layer of protection and use one or two wraps of plastic film to hold it in place. I often write GLASS in large letters with a broad marker on the cardboard.
- Add corner protectors – on all four corners (homemade cardboard corners also work fine).

- Wrap the whole thing again with stretch / cling film, around the frame lengths – to hold the cardboard face and corner protectors securely in place.
- For long trips or expensive frames, – also consider covering the exposed frame edges between the corner guards with cardboard strips.
- Tape down any hardware — with painter’s tape: hanging wire or hooks on the back — so it can’t catch on or scratch anything else in transit.

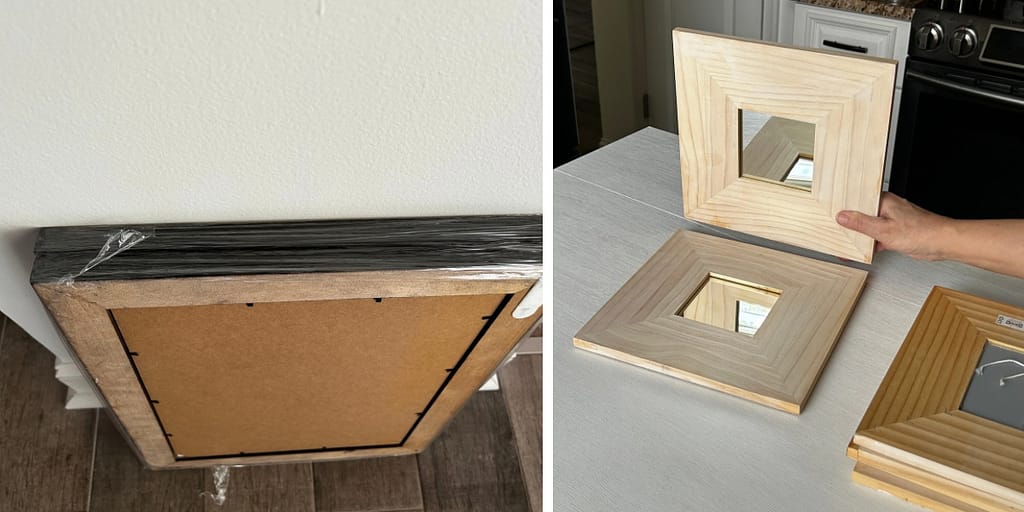
Transport framed items the same way they hang: upright, never flat. If you’re placing more than one against each other, pack them LIKE FACES TOGETHER: face-to-face or back-to-back, this rule goes for just about anything.
Packing Clothing for a Short Move vs. a Long One
Your approach here should scale with distance, same as everything else:
For a short move: slit a small hole in the bottom of an unscented trash bag, pull it down over a group of hanging clothes (still on their hangers), and twist-tie the hanger tops together and pull the drawstring and tie it at the bottom. At your new place, hang the clothes right away — or, at minimum, open the bottom to let air circulate if you can’t unpack immediately.
For folded items: a suitcase or box works well; just line it with a clean plastic bag first for extra protection.
Use suitcases for small items — underwear, accessories, shoes, or handbags are all a natural fit.
For a long-distance move: put clothing into Ziplock moving bags, then place those bags inside a sturdier container. This protects against sharp objects or corners poking through, as well as moisture getting in.
Packing Liquids and Toiletries Without the Spills
Bag anything that could leak. Put cleaning supplies, toiletries, or any liquid container that might spill into a Ziplock bag first as a safety net.
Seal the cap properly. Wrap cling film around the neck of the bottle and over the top of the cap to help prevent seepage or the cap working loose in transit.
Account for temperature changes. If a bottle is soft plastic and might sit in a hot storage unit or truck, squeeze out a little air before recapping — the contents may expand with heat, and this gives them room to do so without bursting the seal.
Keep chemicals separated and labeled. Store bottles upright, never pack anything dangerous next to a product it could react badly with if mixed, and clearly label any box containing chemicals.
Books, Electronics, and Small Parts
Books are heavy — box them accordingly. Use smaller boxes so they stay manageable to lift. Banker boxes work particularly well since they’re built for weight and have handles. When you are done with them, they unfold to store easily. If you’re storing important books in a storage unit, consider taping over the handle openings or put books into a bag before boxing/crating — neither boxes nor crates fully block moisture in the environment although plastic crates protect more against flooding from neighboring units or from a leaky roof. A moisture-absorbing sachet or a box of baking soda with holes punched in the top laced inside of the container can also help prevent mildew in long-term storage.
Back up before you box up. Before packing electronics, make sure everything is backed up — you don’t want a damaged laptop to also mean lost files. I like to use a double method – back up to a cloud and also some type of physical removable hardware.
Photograph the wiring before you disconnect anything. A quick phone photo of how your TV or entertainment system is plugged in will save you real frustration later — cables all look the same once they’re packet together in a box.
Bag and label every cord. Small Ziplock type bags with a permanent-marker label for each cord (or a piece of tape wrapped around the cord if you’re out of bags) means you’ll actually know what goes where when you set up your new place.
For long moves or when storage space is premium, I may disassemble some furniture: wrap matching components together with plastic shrink wrap, and put all screws and fasteners for that piece in a zip-lock type bag, separately, labeled with a permanent marker. Either wrap the labeled bag directly to its matching furniture piece with the cling-film/plastic wrap, or designate one shoebox to hold every fastener bag from the whole move — just make sure it’s somewhere it won’t get lost or knocked aside.
Furniture: From Small Pieces to Upholstered Sofas
– Group similar items together. Gang furniture and accessories of similar size, shape, or use for the most efficient use of space and the safest results in transit.
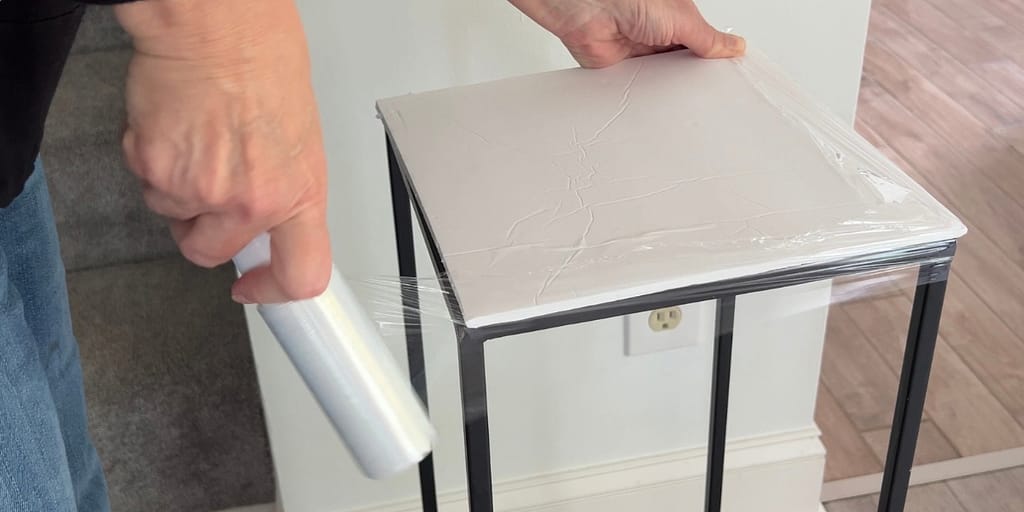
For small furniture, protect delicate faces, corners, and edges with cling film and saved household cardboard, plus a layer of cushioned plastic wrap where needed.
For large upholstered furniture: remove all cushions and pillows first, and bag them separately — large purpose-made Ziplock moving bags if you’re moving long distance or into storage (to guard against moisture and insects), or trash bags for a short move, since either can be reused afterward. Wrap the remaining frame — the sofa or chair body — in wide cling film to protect the fabric from dirt during the move.
Mark “do not stack” boxes clearly
My system: Blue painter’s tape in a big X across the top of a box or container tells movers instantly that nothing should go on top of that box — a far faster visual cue than expecting anyone to stop and read a label.
Pack an “Open Me First” box
Fill it with the essentials you’ll want within the first hour in your new place: toiletries, a change of clothes, bedsheets, a towel, basic cleaning supplies, and any first-aid items. Don’t forget to also pack drinks, and special needs items: for pets, children or yourself.
For the wider moving process, our Moving Out & Moving In Checklist can help you keep track of everything before, during and after moving day.
Quick-Fire Packing Tips to Remember
Start earlier than feels necessary — ideally, double whatever timeframe you’re picturing. Sorting what to keep, give away, sell, or toss always takes longer than expected. For more help with this stage, see our guide to depersonalizing and decluttering your home.
Pack by room or purpose in smaller or medium-sized boxes, rather than piling unrelated items into one oversized container. It’s easier for movers to deliver to the right room, easier for you to unpack, lighter and more easy to lift and carry, and it gets you feeling settled faster.
One material tip worth repeating from Part 1: don’t overlook what’s already in your house. Kitchen cloths, potholders, bath towels, sheets, pillows, and even drapery all make excellent packing cushioning, and using them means less bubble wrap to buy and less to unpack later.
Use the empty space inside objects. A laundry basket, for instance, is a great spot to nest smaller matching items rather than wasting a whole box on them.
Pack with your destination in mind. You’ll spend your first few weeks in the new place saying “have you seen my…” or “which box did I put… in?” — a thoughtful packing order now helps reduce real frustration later.
Once your boxes are packed, labeled, and loaded, the next milestone is getting settled. If you haven’t already, take a look at what to do first after you get the keys so your first few days feel calm instead of chaotic.