Home Interior Painting: How to Choose Primers, Paint & Tools
A successful home interior painting project usually comes down to preparation, the right materials, and understanding how to paint interior walls properly. Here are my thoughts on how to approach your home interior painting project, because using the right primers, paints, and tools is essential to achieving a professional-looking finish.
CHOOSING PRIMERS & SEALERS FOR PREP
Start with the right foundation, and then your paint will look the best that it can.
Primers
Think of primer as a “sandwich layer” between your substrate and your outer paint surface that seals, smooths, and prepares the surface to receive the paint. Do you need to use a primer before you paint? I say yes if any one of these things is true:
- You have an existing semi-gloss or glossy wall or substrate and need to improve adhesion
- You need to seal the substrate so that the final coat of paint maintains a homogenous sheen and color – often after a repair or mold remediation has been done
- You need to cover a dark color so the new paint reaches its true shade more quickly
- You need to remove a strong smell of smoke that has penetrated into the walls and ceiling
- You have a water leak that has been repaired, but has left a stain
Many modern wall paints claim to include “primer,” but this is usually a paint primer, designed to help the paint roll on more evenly and thickly, not a true adhesion primer. Always check the label.
Adhesion primer is important to consider when painting over semi-gloss or other shiny finishes. Those surfaces are designed to repel water and dirt, so regular paint won’t stick well either, without help. Even after cleaning (see above), surfaces can still resist paint, and a dedicated primer, or a de-glosser (on trim or smaller areas) can solve this.
Surface preparation like this is also an important step when preparing a home for sale, especially if repairs have been made.
Primers for Stains, Mold, and Odors
For blocking stains, odors, and smoke, oil-based primers (alkylids) are the most effective. I have had numerous clients insist on using a water-based primer before repainting after leaks or to contain cigarette smells, and they are generally never happy with the results. Water stains seem to vanish initially after using water based primer, but then come back and bleed through the paint after it dries.
Oil-based primers come in spray cans and as brush/roll-on in cans. Most spray-can primers are solvent/oil-based, which you can confirm by checking the cleanup instructions. If a paint requires soap and water, it’s water-based; if it requires solvent, it’s oil-based.
If mold has been properly treated, you can also use a mold-blocking primer or paint for added protection. This will prevent new mold but not kill mold that’s already there, so make sure you have eliminated the mold first.
Sealers
New drywall, plaster, or any freshly installed sheetrock must be sealed before painting interior walls. These surfaces are extremely porous and will absorb paint unevenly. A sealer, usually PVA, creates a uniform surface so subsequent coats of paint apply evenly and don’t show differences in sheen. Most sealers, the ones that dry white-ish, do not require any further priming.
CHOOSING PAINT

The two most common paints today are acrylic latex and oil-based (alkyd). Oil-based paints are now used mostly for specialty applications, exterior trim, metal, or areas that need a very hard-wearing finish. Latex paints are the most likely choice when painting interior walls and ceilings because they dry faster, are easier to work with and clean up, often contain fewer VOCs, and are generally more environmentally friendly.
Latex paints are also great for interior surfaces because they are durable, low-odor, and easy to clean. Besides their easy care factor, adding fresh paint as a home seller helps create the kind of clean visual impression discussed in what buyers notice first when entering a home.
When repainting, follow the rule of like-over-like: repaint latex over latex and oil over oil. Some older interior trim may still be coated with oil-based paint. If you’re unsure, rub a small hidden spot with a cloth dipped in acetone or rubbing alcohol. If the paint comes off, it’s latex.
If you need to apply latex over oil, such as on baseboards or door trim, use liquid sandpaper (a de-glosser). Rub or paint on to trim as directed to dull the surface and give it enough “tooth” (texture) before painting for the latex paint to adhere properly. This is especially helpful when applying paint for trim and doors.
Paints are also formulated for specific uses. For example, a semi-gloss marked “for trim” often contains additives that improve flow and increase durability, like an enamel. Ceiling paint includes additives that reduce splatter and improve coverage overhead.
Want help choosing the right colors for your home? Take a look at our guide How to Paint a Home as Part of Home Staging: Choosing a Palette, which includes before-and-after examples.
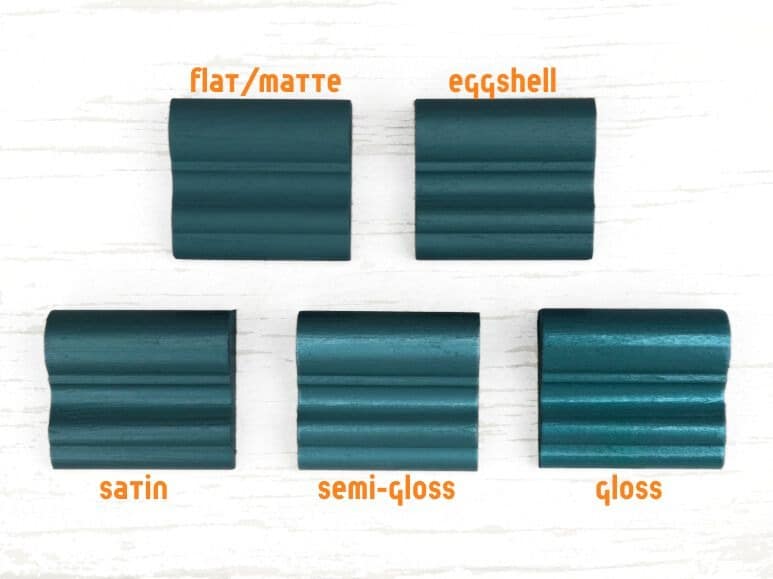
Sheen
For interior walls, I typically choose the lowest sheen one step above flat, which is usually eggshell. Flat finishes aren’t generally washable. And while some brands now offer “Flat” and “Matte,” the distinction can be vague.
Higher sheens, satin, and semi-gloss are best for doors and trim. As a general rule, I choose one sheen grade up (shinier) from the walls for my trim sheen.
When comparing eggshell vs satin paint, eggshell is usually preferred for walls while satin offers better durability for trim and high-traffic areas.
Calculating how much paint you need
Many homeowners ask how much paint for a room before starting a project. To estimate paint needs and understand how to calculate how much paint you need, multiply the room’s height by the total width of all walls for the square footage.
For Ex.: an 8 ft x 10 ft room (std 8 ft high) will be 10 + 8 + 10 + 8 = 36 total in widths, then x 8 high = 288 square feet to cover.
A gallon of interior latex usually covers about 400 sq. ft. per coat. I don’t subtract doors or windows because I treat that extra amount as built-in touch-up paint.
Knowing how much paint for a room before starting helps avoid delays and ensures consistent color across the entire surface.
It’s always better to buy more paint than you think you need. If you run out and need another can mixed later, it almost never dries to an exact match. When painting wall-by-wall, if I can see I won’t have enough paint to finish the next wall completely, I stop and buy more, then pour the new can into the existing paint to blend any slight color variations. Never start a wall with a fresh, unblended can.
Most interior walls need at least two coats to achieve proper color and finish. I’ve been tempted before to apply one thick coat, but that usually leads to drips, roller-edge marks, slow drying, and uneven coverage. Thick paint simply doesn’t move across the surface well—every time I try it, I wish I hadn’t.
If you’re simply refreshing a wall in the same color, one coat is usually enough when painting interior walls.
Top Tip
Most paint stores sell two kinds of paint – for consumers and for pros. I like to visit a store that sells quality paint and ask which paint line local pros buy most. It’s usually one step up from the cheapest basic pro line paint, still excellent – but at a lower cost. If it wasn’t, the pros wouldn’t use it! Some of these come only in 5-gallon buckets, so check sizes. Keep in mind: pro paints typically dry faster, so you’ll need to work efficiently.
These professional lines are often considered some of the best paint for interior walls, especially when durability and smooth coverage matter.
Paint Additives
They also extend drying time so you have more time to perfect the finish.
Sometimes I use additives like Floetrol (for latex) or Penetrol (for oil/alkyd). I choose these additives especially when I am painting doors or cabinetry or maybe using older paint. These thin the paint slightly, making it smoother, more workable, and better at self-leveling, especially helpful for eliminating brush or roller marks, working in cold rooms, or using a sprayer.
These additives are especially useful when applying paint for trim and doors, where a smooth finish is more noticeable. Using additives is not the same as thinning with water. Water changes the paint’s chemistry, and I generally don’t recommend doing that.
TOOLS
Choosing The Right Brush
Choosing the right paintbrush starts with matching the bristle type to the paint. Use synthetic bristles (nylon or polyester) for water-based latex paints and natural bristles for oil-based coatings.
Brush shape also matters. An angled sash brush is ideal for cutting in along ceilings, trim, and corners, while a flat brush works better for long, smooth strokes on walls and doors.
Select the brush size based on the area you’re painting. Smaller 1″–2″ brushes offer precision for trim and detail work. Wider 2½”–3″ brushes help cover broader surfaces more efficiently.

Bristle stiffness affects control:
- Medium-stiff bristles offer balanced control for most interior work.
- Stiff bristles create sharper lines along trim and edges.
For very smooth finishes, like doors or cabinets, choose a high-quality brush with finely tapered bristles. These reduce visible brush marks and help the paint level out cleanly when applying paint for trim and doors.
Don’t overlook the handle. A shorter or ergonomic handle often gives better control in tight indoor spaces.
Investing in a good brush is worth it. Quality brushes hold more paint, lay it down more evenly, and ultimately save time while giving you a cleaner, more professional finish. You can buy one quality brush that delivers exceptional results you are proud of or three cheap brushes that deliver average at best results, and you have since thrown them away.
Choosing the Right Paint Roller Cover
Rollers (specifically, the covers that fit onto them) are their own subject. When selecting one, consider three things:
- The type of surface you will be painting on
- The type of paint you’re using
- The desired effect/surface smoothness of the final dry paint
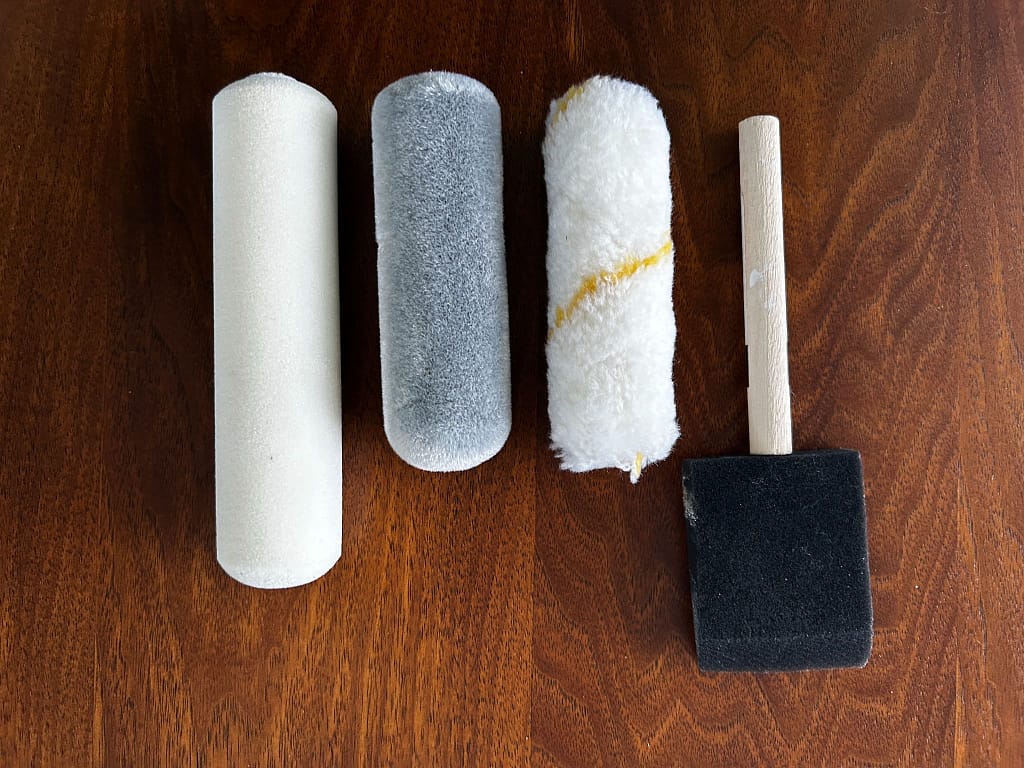
Roller covers are defined by their Nap, the thickness and length of the fibers around the roller tube, ranging from 3/16″ to 1 1/2″.
Most rollers are made from nylon or a nylon/polyester blend, which works well with latex paints. Polyester knit rollers are designed specifically for latex because their crimped fibers hold paint efficiently. Microfiber rollers claim to absorb and release more paint for faster coverage. Wool/polyester blends work with both latex and oil and are good for gloss and semi-gloss finishes because wool retains its fibers well.
Natural-fiber covers are often used outdoors because they hold a large volume of paint. Blended-weave rollers try to offer the advantages of both materials.
How to choose the Nap
Ask what kind of surface you’ll be painting and what kind of end finish you want the paint to have. Keep in mind: Shorter naps create smoother finishes; longer naps hold more paint and reach into textured surfaces.

Short Nap (foam 0”–3/8″)
Use for very smooth finishes, such as cabinet doors. Foam rollers (no nap) through 1/4″ naps apply thin, smooth coats. I often use them to apply a smooth primer base coat and then brush on a top coat for interior trim and paint for trim and doors.
Medium Nap (3/8″–3/4″)
Ideal for most walls and ceilings.
- 3/8″ – 1/2” work for standard drywall – walls and ceilings
- 1/2″–3/4″ for slightly more textured surfaces like light knockdown or sand coat
Long Nap (3/4″–1 1/2″)
Best for rough or highly textured surfaces such as brick, stucco, or sealed concrete block. They carry enough paint to push it into all the crevices. Using a long nap on smooth surfaces will leave a bumpy, uneven “mopped-on” texture.
Some naps are designed specifically for ceilings, helping hold more paint while minimizing splatter.
You also have a choice of a 12” wide roller cover and the wider 18” that many pros like to use because it makes their work faster, but they don’t work with buckets or standard paint trays. Consider also the benefit of a 12” roller being lighter (a benefit when painting interior walls and ceilings).
One last thought on rollers – get a handle with some cushion if you decide to roll by hand and not use a pole.
Painter’s Tray vs. Bucket and Grate
Painter’s trays are easy to find and work well for smaller jobs or when you need to switch liners quickly, such as moving between primer, ceiling paint, and wall paint. They’re also ideal if you’re using an 18-inch roller, provided you have the corresponding wider tray.
And if you are using a pole on your roller, it’s nice to have the tray on the floor (place it where you wont kick it).
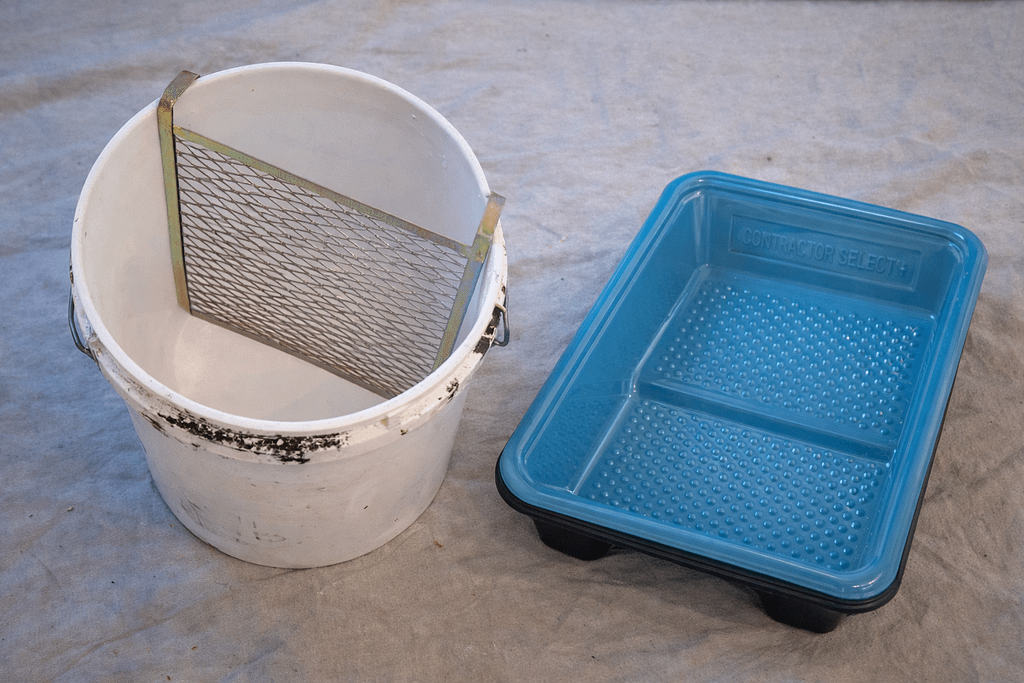
Most pros, however, prefer a 5-gallon bucket with a roller grid. Buckets hold far more paint than trays, are much harder to tip over (especially useful when painting interior walls and ceilings), and allow you to box paint mixing multiple cans together for consistent color. You’ll need a extra empty bucket to start with. There are 18” wide square buckets if you prefer to use the wider roller with a bucket. Look for those at the pro shops.
Other Essential tools
A painter’s pole (or rod) makes painting ceilings much faster, with no constant ladder-climbing and no standing directly beneath the area you’re painting, which also helps avoid splatter. A pole is equally useful for walls and floors, and most pros prefer a telescoping version for flexibility.
Top Tip
If you don’t have a telescopic painting pole but need one in a jiffy, try all of your broom handles to see if the threads on the end of any of them fit your roller handle.
My Painting Toolkit
- Touch-up brushes
- Razor blade
- Nitrile gloves
- Microfiber rags
- Hat and optional protective eyewear
- Ladder for cutting in near the ceiling
- Foil or cling wrap for storing a brush overnight
- Plastic bag for storing a roller in the fridge if painting the next day
- Paint can opener
- Masking tape
- Paper towels
- Newspapers or a protective surface under paint cans
- Floetrol
- Music source
- And of course, all previously mentioned essentials: rollers, handles, extenders, brushes, trays, liners or buckets & grids, paint cups, and drop cloths.
IN CONCLUSION
Whether you’re planning a full home interior painting project or simply refreshing a room, taking the time to choose the best paint for interior walls, understanding how to paint interior walls, and knowing how to calculate how much paint you need can make the entire process smoother and more successful.
With the right combination of primers, paints, and tools, and a clear understanding of when and how to use them, you can dramatically improve the quality, durability, and appearance of any paint job. Let your tools do the work, trust the process, and you’ll finish with a result you can be proud of.